Virtualenv Installation
This is a step-by-step installation guide for Mailman Suite, also sometimes referred as Mailman 3 Suite or just Mailman 3. There are more than one ways to have Mailman 3 running on your machine.
The commands in this guide are tailored for Ubuntu/Debian systems.
Dependencies
- Python3.9+.
Mailman supports any version of Python > 3.9, 3.11 is recommended as it is the latest version of Python supported by Mailman.
- MTA Setup
Mailman 3 in theory would support any MTA or mail server which can send emails to Mailman over LMTP. Officially, there are configurations for Postfix, Exim4, qmail and sendmail. Mailman Core has a fairly elaborate documentation on setting up your MTA. Look below at Installing Mailman Core to find out the location of configuration file
mailman.cfgwhich is mentioned in the documentation above.The Web Front-end is based on a Python web framework called Django. For email verification and sending out error logs, Django also must be configured to send out emails.
This guide uses setup instructions for Postfix.
- Sass compiler
A sass compiler. Syntactically Awesome Stylesheets or Sass is an extension of CSS, which is used to style webpages, that adds more power to the old CSS syntax. It allows using variables, nested rules, inline imports etc. which CSS originally doesn’t support. Hyperkitty uses this to generate CSS styles.
You can use the C/C++ implementation. Please look at the installation guide for sass to see how you can get one.
- Python development packages
Python3 dev package. This is required for building Postorius
- Fulltext search
A full text search engine like Whoosh or Xapian. Whoosh is the easiest to setup and can be installed in the virtualenv.
See also
Virtualenv setup on how to setup the virtualenv.
- Lynx
An HTML to plaintext converter like
lynxis required by Mailman Core if you have configured it to convert emails to plaintext.
Installing Dependencies
To install Mailman Core, you need to following system packages:
$ sudo apt install python3-dev python3-venv sassc lynx
Setup database
This guide is based off on Postgresql database engine. Mailman also supports
MySQL/MariaDB in case you have that already running for other applications. The steps
shown for Postgresql are generic SQL. If you are using a different database, just
substitute its command line utility for psql. A few known differences between
Postgresql and other database engines are noted below.
$ sudo apt install postgresql libpq-dev

$ sudo -u postgres psql
psql (12.5 (Ubuntu 12.5-0ubuntu0.20.04.1))
Type "help" for help.
postgres=# create database mailman;
CREATE DATABASE
postgres=# create database mailmanweb;
CREATE DATABASE
postgres=# create user mailman with encrypted password 'MYPASSWORD';
CREATE ROLE
postgres=# grant all privileges on database mailman to mailman;
GRANT
postgres=# grant all privileges on database mailmanweb to mailman;
GRANT
postgres=# \q
Note
Replace ‘MYPASSWORD’ with a secret password.
We created two databases named, mailman and mailmanweb for Mailman Core
and Mailman Web (Django) respectively. We also created a new user mailman
and granted it privileges to both the databases.
Setup Mailman user
Create a new user to run all the Mailman services:
$ sudo useradd -m -d /opt/mailman -s /usr/bin/bash mailman
$ sudo chown mailman:mailman /opt/mailman
$ sudo chmod 755 /opt/mailman
$ sudo su mailman
Virtualenv setup
Virtualenv is Python’s mechanism to create isolated runtime environments.
Hint
If you are not familiar with virtualenv, checkout the user guide for virtualenv.
Note
Make sure that you are running commands as mailman user from here forth. Setup Mailman user.
Create the virtualenv for Mailman:
$ cd /opt/mailman
$ python3 -m venv venv
Activate virtualenv:
Activate the created virtualenv:
$ source /opt/mailman/venv/bin/activate
Note
The rest of this documentation assumes that
virtualenv is activated. Whether or not
virtualenv is activated can be seen by a (venv) before the shell
prompt.
You can setup mailman user’s shell to automatically activate the virtualenv
when you switch to the user by running:
$ echo 'source /opt/mailman/venv/bin/activate' >> /opt/mailman/.bashrc
Installing Mailman Core
Mailman Core is responsible for sending and receiving emails. It exposes a REST API that different clients can use to interact with over an HTTP protocol. The API itself is an administrative API and it is recommended that you don’t expose it to outside of your host or trusted network. To install Core run:
(venv)$ pip install wheel mailman psycopg2-binary
This will install latest release of Mailman Core,
and Python bindings for Postgresql database.
If you are using a different database manager, do not install psycopg2-binary.
Currently Django>=2.2,<3.1 requires psycopg2-binary<2.9, but those are no
longer supported so pinning psycopg2-binary<2.9 should be unnecessary.
See this issue.
Later versions of Django will work with psycopg2-binary 2.9.x.
After this, create a configuration
file at /etc/mailman3/mailman.cfg for Mailman Core:
# /etc/mailman3/mailman.cfg
[paths.here]
var_dir: /opt/mailman/mm/var

[mailman]
layout: here
# This address is the "site owner" address.  Certain messages which must be
# delivered to a human, but which can't be delivered to a list owner (e.g. a
# bounce from a list owner), will be sent to this address.  It should point to
# a human.
site_owner: user@example.com

[database]
class: mailman.database.postgresql.PostgreSQLDatabase
url: postgresql://mailman:MYPASSWORD@localhost/mailman

[archiver.prototype]
enable: yes

# For the HyperKitty archiver.
[archiver.hyperkitty]
class: mailman_hyperkitty.Archiver
enable: yes
configuration: /etc/mailman3/mailman-hyperkitty.cfg

[shell]
history_file: $var_dir/history.py

[mta]
verp_confirmations: yes
verp_personalized_deliveries: yes
verp_delivery_interval: 1
And, create the /etc/mailman3/mailman-hyperkitty.cfg file containing these settings:
[general]
base_url: http://127.0.0.1:8000/archives/
api_key: Secret_Hyperkitty_API_Key
See also
The further configuration setup for Mailman Core Configuring Mailman Core.
Setup MTA
A Mail Transfer Agent (MTA) is responsible for sending and receiving Emails on the server. This guide is based off on Postfix MTA, but Mailman also supports other MTAs like Exim4 etc:
$ sudo apt install postfix
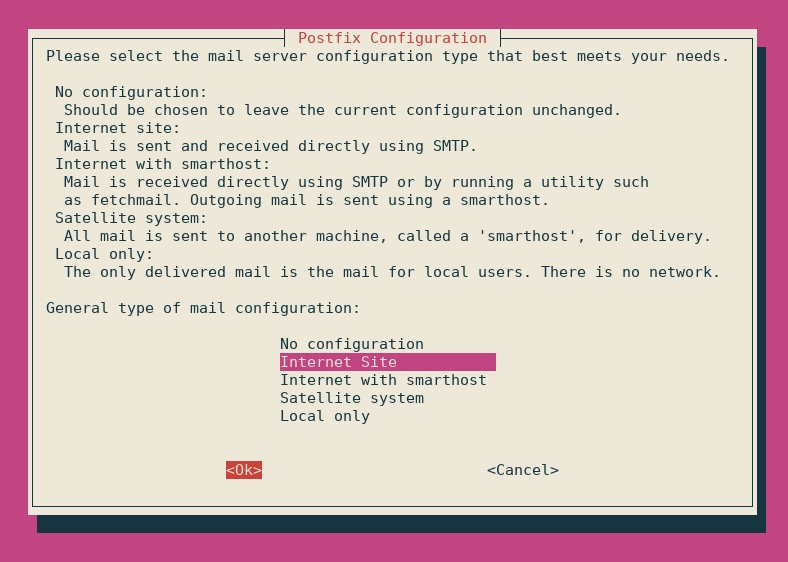
Choose “Internet Site” when prompted during installation for choosing Postfix configuration.
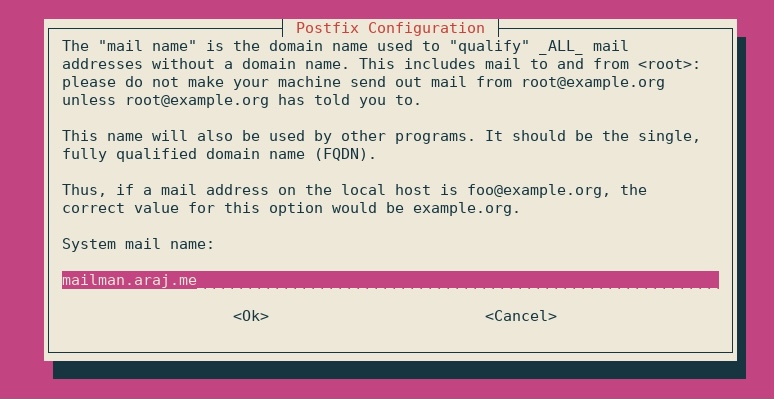
Enter the domain name you have chosen for Mailman in next step.
To configure Postfix to relay emails to and from Mailman add the following to
Postfix’s configuration at /etc/postfix/main.cf:
unknown_local_recipient_reject_code = 550
owner_request_special = no

transport_maps =
    hash:/opt/mailman/mm/var/data/postfix_lmtp
local_recipient_maps =
    hash:/opt/mailman/mm/var/data/postfix_lmtp
relay_domains =
    hash:/opt/mailman/mm/var/data/postfix_domains
Note that in the above, if your current main.cf contains settings for these items, including the default setting for local_recipient_maps, you should add the Mailman setting to the existing setting rather than replacing it. For example:
local_recipient_maps = proxy:unix:passwd.byname $alias_maps
    hash:/path-to-mailman/var/data/postfix_lmtp
See also
See detailed documentation to setup Postfix with Core and some unusual configuration if you already have Postfix running.
Starting Mailman automatically
To start Mailman Core automatically on boot, you can setup a systemd service. Create a
new file /etc/systemd/system/mailman3.service:
[Unit]
Description=GNU Mailing List Manager
After=syslog.target network.target postgresql.service

[Service]
Type=forking
PIDFile=/opt/mailman/mm/var/master.pid
User=mailman
Group=mailman
ExecStart=/opt/mailman/venv/bin/mailman start
ExecReload=/opt/mailman/venv/bin/mailman restart
ExecStop=/opt/mailman/venv/bin/mailman stop

[Install]
WantedBy=multi-user.target
If you are not using PostgreSQL as your RDBMS, you should substitute the
appropriate service in the After= line.
In cases of abnormal shutdown, the RDBMS may need to replay transactions etc., which will take some time. It is reported that MariaDB (and probably MySQL) reports successful initialization before the recovery process is done, so Mailman fails to start because it can’t connect to the database. You may want to add the lines:
Restart=on-failure
RestartSec=15
to the [Service] section of mailman3.service. (PostgreSQL probably
does not suffer from this problem because it uses sd_notify(3) to
indicate successful initialization rather than the exec of the daemon process.)
You can load this configuration by running:
$ sudo systemctl daemon-reload
# Check the status of the service.
$ sudo systemctl status mailman3
Depending on where the mailman3.service file is installed you may need to
run systemctl enable mailman3.service before daemon-reload.
To start the systemd service and Mailman Core:
$ sudo systemctl start mailman3
# Verify that the service is running.
$ sudo systemctl status mailman3
After this, running mailman info (as mailman user with
virtualenv active ) should give you an
output which looks something like below:
(venv)$ mailman info
GNU Mailman 3.3.2 (Tom Sawyer)
Python 3.8.5 (default, Jul 28 2020, 12:59:40)
[GCC 9.3.0]
config file: /etc/mailman3/mailman.cfg
db url: postgresql://mailman:MYPASSWORD@localhost/mailman
devmode: DISABLED
REST root url: http://localhost:8001/3.1/
REST credentials: restadmin:restpass
Warning
Pay attention to the config file output above and make
sure that you see /etc/mailman3/mailman.cfg there. If the config path is different,
you should make sure to create a new config file at /etc/mailman3/mailman.cfg and
re-run the command.
Setup Cron Jobs
Mailman Core requires some cron jobs for periodic actions. To setup cron jobs for Mailman You can run:
sudo -u mailman crontab -e
Add the following in the editor:
@daily /opt/mailman/venv/bin/mailman digests --periodic
@daily /opt/mailman/venv/bin/mailman notify
This will run the commands at midnight every day, you can configure running
them at specific time by replacing @daily with 0 8 * * * for running at
08:00 instead.
Installing Web UI
Postorius and Hyperkitty are Mailman’s official Web UI and Archiver. Mailman-web provides a convenient single package to install both of these.
To install the web components, run the following commands with virtualenv activated:
(venv) $ pip install mailman-web mailman-hyperkitty
Initial Configuration
Then, create a new configuration file at /etc/mailman3/settings.py. A
sample configuration looks something like this:
# Mailman Web configuration file.
# /etc/mailman3/settings.py

# Get the default settings.
from mailman_web.settings.base import *
from mailman_web.settings.mailman import *

# Settings below supplement or override the defaults.

#: Default list of admins who receive the emails from error logging.
ADMINS = (
    ('Mailman Suite Admin', 'root@localhost'),
)

# Postgresql database setup.
DATABASES = {
    'default': {
        'ENGINE': 'django.db.backends.postgresql_psycopg2',
        'NAME': 'mailmanweb',
        'USER': 'mailman',
        # TODO: Replace this with the password.
        'PASSWORD': '$MYPASSWORD',
        'HOST': 'localhost',
        'PORT': '5432',
    }
}

# 'collectstatic' command will copy all the static files here.
# Alias this location from your webserver to `/static`
STATIC_ROOT = '/opt/mailman/web/static'

# enable the 'compress' command.
COMPRESS_ENABLED = True

# Make sure that this directory is created or Django will fail on start.
LOGGING['handlers']['file']['filename'] = '/opt/mailman/web/logs/mailmanweb.log'

#: See https://docs.djangoproject.com/en/dev/ref/settings/#allowed-hosts
ALLOWED_HOSTS = [
    "localhost",  # Archiving API from Mailman, keep it.
    "127.0.0.1",
    # "lists.your-domain.org",
    # Add here all production domains you have.
]

#: See https://docs.djangoproject.com/en/dev/ref/settings/#csrf-trusted-origins
#: For Django <4.0 these are of the form 'lists.example.com' or
#: '.example.com' to include subdomains and for Django >=4.0 they include
#: the scheme as in 'https://lists.example.com' or 'https://*.example.com'.
CSRF_TRUSTED_ORIGINS = [
    # "lists.your-domain.org",
    # Add here all production domains you have.
]

#: Current Django Site being served. This is used to customize the web host
#: being used to serve the current website. For more details about Django
#: site, see: https://docs.djangoproject.com/en/dev/ref/contrib/sites/
SITE_ID = 1

# Set this to a new secret value.
SECRET_KEY = 'MyVerrySecretKey'

# Set this to match the api_key setting in
# /opt/mailman/mm/mailman-hyperkitty.cfg (quoted here, not there).
MAILMAN_ARCHIVER_KEY = 'Secret_Hyperkitty_API_Key'

# The sender of emails from Django such as address confirmation requests.
# Set this to a valid email address.
DEFAULT_FROM_EMAIL = 'admin@example.com'

# The sender of error messages from Django. Set this to a valid email
# address.
SERVER_EMAIL = 'admin@example.com'
In the above configuration, make sure to
Change the database password in
DATABASESSet one or more admins in
ADMINSfor all the users who will receive emails about errors and exceptions in Django.Add any domains/IP addresses you want to serve Mailman web from into
ALLOWED_HOSTSconfig.Make sure that the logging path is created. You can run
mkdir -p
/opt/mailman/web/logs
to create the path.Also make sure the
STATIC_ROOTdirectory is created.Set the
SECRET_KEYto a random value.
See also
All the default settings in mailman-web can be found here.
Run database migrations
To setup the database schema for Mailman’s web components, run:
(venv)$ mailman-web migrate
Collect static files
To copy all the static files (css, js, images) into the STATIC_ROOT from
Initial Configuration run:
(venv)$ mailman-web collectstatic
Compress CSS files
To compress the various CSS files offline run:
(venv)$ mailman-web compress
Compile messages for l10n
To update the message catalogs for supported languages run:
(venv)$ mailman-web compilemessages
Setting up a WSGI server
See also
These instructions are to setup your Django website behind a webserver. We are using uwsgi as the wsgi server to communicate between the webserver and Django, however Setting up Gunicorn is also a good choice. To install uwsgi, run:
(venv)$ pip install uwsgi
Note
The configuration below doesn’t serve static files, so if you are just “trying-it-out” and want static files to be served, you need to add some additional configuration and steps. See serving static files with uwsgi.
See also
See also
Create a configuration file for uwsgi at /etc/mailman3/uwsgi.ini:
# /etc/mailman3/uwsgi.ini
#
[uwsgi]
# Port on which uwsgi will be listening.
http-socket = 0.0.0.0:8000
# If running uwsgi from the virtual environment ...
virtualenv = /opt/mailman/venv/

module=mailman_web.wsgi:application
# Set PYTHONPATH
env = PYTHONPATH=/etc/mailman3/
# The default settings module.
env = DJANGO_SETTINGS_MODULE=settings

# Setup default number of processes and threads per process.
master = true
processes = 2
threads = 2

# Setup the django_q related worker processes.
attach-daemon = /opt/mailman/venv/bin/mailman-web qcluster

# Setup the request log.
req-logger = file:/opt/mailman/web/logs/uwsgi.log

# Log qcluster commands separately.
logger = qcluster file:/opt/mailman/web/logs/uwsgi-qcluster.log
log-route = qcluster uwsgi-daemons

# Last log and it logs the rest of the stuff.
logger = file:/opt/mailman/web/logs/uwsgi-error.log
You can run test run uwsgi using the following command:
(venv)$ uwsgi --ini /etc/mailman3/uwsgi.ini
Have a look at uwsgi documentation to learn more about different configuration options.
Setting up Gunicorn
To use Gunicorn instead of uWSGI it isn’t necessary to install Gunicorn as it
is already installed as a dependency of Mailman core. Instead of the above,
create a configuration file for Gunicorn at /etc/mailman3/gunicorn.conf:
# /etc/mailman3/gunicorn.conf
#
bind = ['127.0.0.1:8000']
proc_name = "mailman-web"
chdir = "/opt/mailman/mm"
pidfile = "/opt/mailman/mm/var/gunicorn.pid"
accesslog = "/opt/mailman/mm/var/logs/access.log"
errorlog = "/opt/mailman/mm/var/logs/error.log"
See Gunicorn docs for more on configuring Gunicorn.
Setting up Fulltext search (xapian)
Before moving forward, you need to determine the version of Xapian you want to install. You can find available versions on xapian’s official download page.
Then, download the script which will compile and create a Python package for Xapian to be used:
(venv)$ export XAPIAN_VERSION="1.4.23"
(venv)$ curl https://raw.githubusercontent.com/notanumber/xapian-haystack/master/xapian_wheel_builder.sh -o xapian_wheel_builder.sh
(venv)$ bash xapian_wheel_builder.sh $XAPIAN_VERSION
When the above command succeeds, you will find the Xapian’s wheel
(xapian-<version>-<something>.whl file) in current directory:
(venv)$ ls *.whl
xapian-1.4.23-cp311-cp311-macosx_13_0_arm64.whl
Note that your filename will look different depending on the OS and architecture of your computer. The above was generated on ARM64 macOS.
Then, you can install Xapian (with updated filename from above):
(venv)$ pip install xapian-1.4.23-cp311-cp311-macosx_13_0_arm64.whl xapian-haystack
Finally, configure mailman-web to use Xapian:
# add to /etc/mailman3/settings.py
HAYSTACK_CONNECTIONS = {
    'default': {
        'PATH': "/opt/mailman/web/xapian_index",
        'ENGINE': 'xapian_backend.XapianEngine'
    },
}
Automatically starting Mailman-web
In order to automatically start at startup, you can create a second systemd
service, mailmanweb.service. Create a
new file /etc/systemd/system/mailmanweb.service:
[Unit]
Description=GNU Mailman Web UI
After=syslog.target network.target postgresql.service mailman3.service

[Service]
Environment="PYTHONPATH=/etc/mailman3/"
User=mailman
Group=mailman
ExecStart=/opt/mailman/venv/bin/uwsgi --ini /etc/mailman3/uwsgi.ini
KillSignal=SIGINT

[Install]
WantedBy=multi-user.target
If using Gunicorn, the ExecStart line above becomes:
ExecStart=/opt/mailman/venv/bin/gunicorn -c /etc/mailman3/gunicorn.conf mailman_web.wsgi:application
After creating this file, you can run following commands to start:
$ sudo systemctl daemon-reload
$ sudo systemctl start mailmanweb
Then, you check the status by running:
$ systemctl status mailmanweb
Also, if using Gunicorn, you need an additional service to start Django’s
qcluster. You don’t need this with uWSGI because uWSGI is configured to do
this itself. But, for Gunicorn, create another systemd service,
qcluster.service. Create the file
/etc/systemd/system/qcluster.service:
[Unit]
Description=HyperKitty async tasks runner
After=syslog.target network.target postgresql.service mailman3.service

[Service]
ExecStart=/opt/mailman/venv/bin/mailman-web qcluster --pythonpath /etc/mailman3 --settings settings
User=mailman
Restart=always

[Install]
WantedBy=multi-user.target
After creating this file, you can run following commands to start qcluster:
$ sudo systemctl daemon-reload
$ sudo systemctl start qcluster
Then, you check the status by running:
$ systemctl status qcluster
Cron Jobs for Mailman Web
Mailman Web requires some cron jobs for periodic actions. To setup cron jobs for Mailman You can run:
sudo -u mailman crontab -e
Add the following in the editor:
* * * * *          /opt/mailman/venv/bin/mailman-web runjobs minutely
0,15,30,45 * * * * /opt/mailman/venv/bin/mailman-web runjobs quarter_hourly
@hourly            /opt/mailman/venv/bin/mailman-web runjobs hourly
@daily             /opt/mailman/venv/bin/mailman-web runjobs daily
@weekly            /opt/mailman/venv/bin/mailman-web runjobs weekly
@monthly           /opt/mailman/venv/bin/mailman-web runjobs monthly
@yearly            /opt/mailman/venv/bin/mailman-web runjobs yearly
Nginx Configuration
You can reverse proxy the requests to a uwsgi or gunicorn server using Nginx.
Uwsgi has a special protocol called uwsgi protocol that is available in Nginx
via the ngx_http_uwsgi_module module. That and the uwsgi_params file
are included in a typical Nginx install, but the config below doesn’t use them
and works just as well with gunicorn. Add or edit the configuration file at
/etc/nginx/sites-available/default:
server {

   listen 443 ssl default_server;
   listen [::]:443 ssl default_server;

   server_name MY_SERVER_NAME;
   location /static/ {
        alias /opt/mailman/web/static/;
   }

   location / {
           proxy_pass http://127.0.0.1:8000;
           proxy_set_header Host $host;
           proxy_set_header X-Forwarded-For $remote_addr;

   }
   ssl_certificate /path-to-ssl-certs/cert.pem;
   ssl_certificate_key /path-to-ssl-certs/privkey.pem;

}
For a more complete configuration, you can check out Nginx documentation for setting up SSL.
Replace MY_SERVER_NAME with the appropriate domain name you intend to
serve.
After editing the configuration file, you can restart Nginx to pickup the changes:
$ sudo systemctl restart nginx
After this, you should have Mailman running at https://MY_SERVER_NAME.
Apache Configuration
You can also reverse proxy the requests to a uwsgi or gunicorn server using
Apache. At a minimum, you need to add the following to your existing Apache
configuration at /etc/apache2/sites-available/:
Alias           /static         "/opt/mailman/web/static"
<Directory "/opt/mailman/web/static">
    Require all granted
</Directory>

<IfModule mod_headers.c>
    RequestHeader unset X-Forwarded-Proto
    <If "%{HTTPS} =~ /on/">
        RequestHeader set X-Forwarded-Proto "https"
    </If>
</IfModule>

<IfModule mod_proxy.c>
    ProxyPreserveHost On
    ProxyPass "/mailman3" "http://127.0.0.1:8000/mailman3"
    ProxyPass "/archives" "http://127.0.0.1:8000/archives"
    ProxyPass "/accounts" "http://127.0.0.1:8000/accounts"
    ProxyPass "/admin" "http://127.0.0.1:8000/admin"
    ProxyPass "/user-profile" "http://127.0.0.1:8000/user-profile"
</IfModule>
See Apache docs for more on configuring Apache.